By: Mahmoud Darwish
Hi everybody,
Let me describe a memory.
Every previous OEM patching I’ve done in my career, and I have been working with OEM since 10g, followed roughly the same rhythm. Schedule a Saturday night maintenance window. Send the company-wide email warning that OEM monitoring will be unavailable. Watch the console go dark. Pray nothing critical happens at any of the monitored databases during the next two to four hours, because if it does, no alert is going to fire. No email is going out. The agents are still running locally but nobody is listening to them. You patch. You start the OMS back up. You watch metrics catch up over the next thirty minutes. Then you write the change request close-out.
That was OEM patching. For years. For everyone.
This time was different.
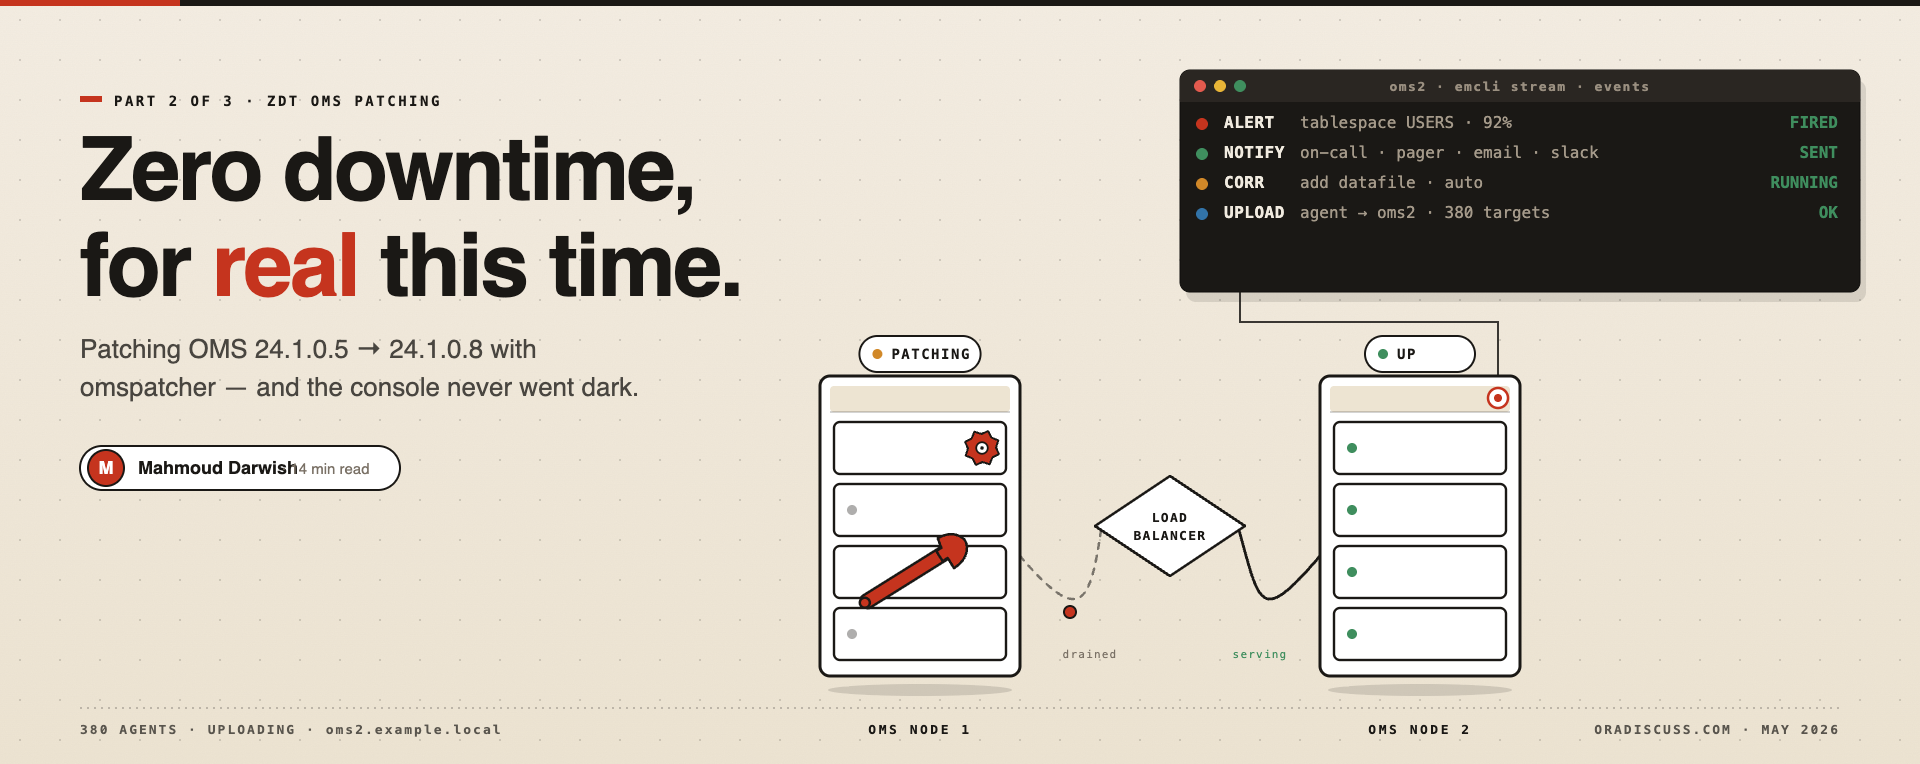
This is the first OEM upgrade I’ve ever performed where the console stayed responsive throughout, alerts kept firing, notifications kept being delivered, and at no point in the entire upgrade was there a “monitoring blackout.” Not one minute. We patched OMS Node 1 while OMS Node 2 carried the load. Then we patched OMS Node 2 while OMS Node 1 carried the load. Zero Downtime patching, applied to a real production OEM environment, working exactly as Oracle has been promising for the last few releases.
In Article 1 of this series, I covered patching the OMR repository database, the foundation that has to be right before you touch anything else. If you missed it, the OMR is on Oracle Database 19.30 with GI MRP 39168344 applied, datapatch SUCCESS confirmed, and the cluster fully healthy. With that foundation in place, this article walks through everything that happened above it: the OMS upgrade from 24.1.0.5 to 24.1.0.8 via omspatcher ZDT patching, the Holistic patch 38864999 applied afterward, and the connectivity change from offline mode to Online MOS via IDCS that fundamentally changed how we manage OEM going forward.
Three tools. One maintenance window. No downtime.
What ZDT Patching Actually Means?
Before getting into the steps, it is worth understanding exactly what Zero Downtime patching is solving, because I think a lot of DBAs hear the term and assume it is marketing language. It is not.
In a traditional OEM patching cycle, the OMS is taken down completely while the patch is applied. The console becomes inaccessible. Alert processing pauses. Notifications queue up but are not delivered. Corrective actions configured to run automatically do not run. Agents continue collecting metrics on the targets but cannot upload them to a stopped OMS. Everything resumes when the OMS comes back up, but the gap window is a real availability hole in your monitoring.
ZDT patching changes this at the architectural level. In a multi-OMS environment, omspatcher patches one OMS at a time in a rolling sequence. While the primary OMS is being patched, the secondary OMS continues serving the console and processing all alert workflows. Alerts fire. Notifications go out. Corrective actions run. Agents upload metrics to whichever OMS is up. The console stays responsive throughout.
For this to work, three architectural pieces must be in place:
Two or more OMS instances behind a load balancer, single OMS deployments cannot do ZDT
The OMR repository database at the right patch level (which is why Article 1 came first)
Shared software library accessible from all OMS instances at the same path
The Marketplace stack we deployed already provided all three. If you built your OEM environment with the official OCI Marketplace Oracle Enterprise Manager Cloud Control image, you already have the architecture for ZDT, you just have to invoke it correctly.
Pre-Upgrade Preparation:
Before downloading the patch, I confirmed the environment was ready:
- Component Required Status
- OMR Database ==> 19.30 + 39168344 ==> (Article 1)
- OMS RU. ==> 24.1.0.5 ==> Current
- Plug-ins. ==> 24.1.1.5 ==> Current
- Agents ==> 24.1.0.5 ==> Current
- OMS count ==> 2 ==> oms1 + oms2
- Load Balancer ==> Active
- Software Library ==> Shared FS ==> /u01/app/oracle/em_shared_fs/swlib/
The shared filesystem is critical, omspatcher will fail with a clear error message if the patch is not staged on a path accessible from all OMS instances. In our environment, the shared mount is at /u01/app/oracle/em_shared_fs/, accessible identically from both oms1 and oms2.
Download the OEM 24ai RU8 patch (24.1.0.8) from My Oracle Support and stage it on the shared filesystem so both OMS instances can read it from the same path:
# On any OMS node, as oracle user
mkdir -p /u01/app/oracle/em_shared_fs/patch
cd /u01/app/oracle/em_shared_fs/patch
unzip p<patch_number>_241000_Generic.zip
The omspatcher properties file also needs to be configured before running the patch. By default, it lives at ~/.omspatcher/omspatcher.properties and contains the SYSMAN credentials and other parameters that omspatcher needs:
ls -l /home/oracle/.omspatcher/omspatcher.propertiesIf this file does not exist or is empty, omspatcher will prompt you for credentials interactively at runtime. I prefer to have it pre-populated for an unattended apply.
Step 1: Apply the OMS RU on Node 1 Using omspatcher
The actual patching command on the primary OMS:
# As oracle user on oms1
$OMS_HOME/OMSPatcher/omspatcher apply \
    /u01/app/oracle/em_shared_fs/patch/<oms_ru_patch_directory> \
    -property_file /home/oracle/.omspatcher/omspatcher.properties \
    2>&1 | tee /home/oracle/oms1_ru_apply.log
The tee redirect saves a copy of the entire output to a log file. Always do this. The on-screen output scrolls fast and you will want the full log later when you write your change request close-out, or if anything needs investigating.
What omspatcher does behind the scenes during ZDT apply:
- Validates the patch and runs prerequisite checks against the OMS Home
- Detects you have multiple OMS instances and asks for confirmation
- Stops the primary OMS (oms1)
- Applies binary patches to oms1’s OMS Home and ext_oms_home
- Starts oms1 back up
- Generates an
addOMSPatcherScript.shthat you copy to oms2 and run there
While oms1 is stopped during the patching window, typically 30 to 45 minutes, oms2 continues serving the console and processing all monitoring activity through the load balancer. This is the moment when ZDT actually delivers what it promises. Users opening the OEM console hit oms2 transparently. Alerts fire. Notifications go out. The system keeps working.
Watch the output as omspatcher runs. You will see the prerequisite checks complete, the OMS stop sequence, the patch application, and the OMS startup sequence. A successful run ends with:
Oracle Management Server Successfully Started
Oracle Management Server is Up
JVMD Engine is Up
OMSPatcher succeeded.
Step 2: Apply the Same Patch on Node 2
Once oms1 is fully back up and the OMS RU8 patch is applied, run the generated script on oms2:
# Copy the addOMS script from oms1 to oms2
scp /u01/app/oracle/em/middleware_241/oms_home/.omspatcher_storage/oms_session/scripts_*/addOMSPatcherScript.sh \
    oms2:/home/oracle/

# SSH into oms2 and execute
ssh oracle@oms2
cd /home/oracle
chmod +x addOMSPatcherScript.sh
./addOMSPatcherScript.sh 2>&1 | tee /home/oracle/oms2_ru_apply.log
The addOMSPatcherScript.sh is generated specifically for the patch you just applied to the primary OMS. It contains the exact omspatcher invocation needed to apply the matching patch state to the secondary OMS. While oms2 patches, oms1, now fully on RU8 handles all monitoring traffic.
When the script completes, both OMS instances are at OMS Platform 24.1.0.8 and Plug-ins 24.1.1.8. Verify:
# As oracle on either OMS
$OMS_HOME/OMSPatcher/omspatcher lspatches | head -10
You should see the new patch IDs in the list. Also verify the OMS version through emcli:
$OMS_HOME/bin/emcli login -username=sysman
$OMS_HOME/bin/emcli get_targets -targets=oracle_emrep | head -5
Status ID    Status      Target Type        Target Name
1            UP          oracle_emrep      Management Services and Repository
The OMS RU portion of the upgrade is complete !!
Step 3: Apply the Holistic Patch 38864999
With the OMS now on 24.1.0.8, the next step is the Holistic patch. This is one of the most useful inventions Oracle has applied to the OEM patching model, instead of asking DBAs to hunt down and apply WebLogic PSU, JDK update, OPatch refresh, and FMW DB Client sub-patches as separate operations, the Holistic patch bundles them all into one patch number, applied with a single omspatcher command, with full ZDT support.
Patch 38864999 covered:
- WebLogic Server PSU → 12.2.1.4.251223
- JDK 8 → 1.8.0_481 (from 1.8.0_461)
- OPatch → 13.9.4.2.22 (from 13.9.4.2.20)
- FMW DB Client → 19.29 via sub-patch 38582077 (from 19.27)
One patch, four components, both OMS nodes, no downtime. That used to be a half-day of work spread across multiple weekend windows.
The application sequence is identical to the OMS RU, primary first, then secondary using the generated script.
Apply on oms1:
# As oracle on oms1
$OMS_HOME/OMSPatcher/omspatcher apply \
    /u01/app/oracle/em_shared_fs/patch/38864999 -spb_patch \
    -property_file /home/oracle/.omspatcher/omspatcher.properties \
    2>&1 | tee /home/oracle/oms1_holistic_apply.log
The -spb_patch flag is what tells omspatcher this is a Stack Patch Bundle (Holistic) rather than a standard OMS RU. Get this flag wrong and the apply fails immediately with a meaningful error.
The first thing omspatcher does is verify your minimum RU version is met:
SUCCESS :: The minimum Release Update (RU) check passed for applying
the given holistic patch. Minimum OMS RU Version is 24.1.0.7
This is why we applied the OMS RU first. Holistic 38864999 requires minimum 24.1.0.7, applying it on 24.1.0.5 would have failed the prerequisite check immediately. The order matters.
Then omspatcher walks through what it is going to do. The output is unusually transparent, you can see exactly what each component is being updated to:
SPB JDK version    :: 1.8.0.481
Env JDK version    :: 1.8.0.461

The Env version is lower as compared to JDK included in patch ::
JDK will be updated
Updating the JDK now...
Stopping the OMS...
The Env Opatch version :: 13.9.4.2.20
The SPB Opatch version :: 13.9.4.2.22
The Environment Opatch version is low as per OPatch included in Patch ::
OPatch will be updated
Updating the Opatch now.......
Updated Opatch Successfully.......After updating JDK and OPatch, omspatcher confirms the secondary OMS that will be patched, validates the shared software library path, and asks for explicit confirmation before proceeding:
The below additional oms will be patched along with the primary oms :
oms2

The software library configured location: /u01/app/oracle/em_shared_fs/swlib/
The patch location /u01/app/oracle/em_shared_fs/patch/38864999 is not
staged in the software library.
Ensure the patch location is available in the software library or
shared mount point that is accessible from all the additional OMS instances.

Do you want to proceed? [y|n]
y
Type y to confirm. From this point omspatcher patches oms1’s oms_home and ext_oms_home, restarts the OMS, and generates the addOMSPatcherScript.sh for oms2:
We will not be patching the add omses.......generating the addomsScripts
The addoms script is generated
    /u01/app/oracle/em/middleware_241/oms_home/.omspatcher_storage/
    oms_session/scripts_16-18-12/addOMSPatcherScript.sh
Copy the script to the add oms and run it

OMSPatcher succeeded.
Apply on oms2:
Copy the generated script and run it on oms2, same approach as Step 2:
# Copy the addOMS script from oms1 to oms2
scp /u01/app/oracle/em/middleware_241/oms_home/.omspatcher_storage/oms_session/scripts_*/addOMSPatcherScript.sh \
    oms2:/home/oracle/

# Execute on oms2
ssh oracle@oms2
chmod +x addOMSPatcherScript.sh
./addOMSPatcherScript.sh 2>&1 | tee /home/oracle/oms2_holistic_apply.log
When this completes, both OMS instances are fully on Holistic 38864999, WebLogic, JDK, OPatch, and FMW DB Client all updated in a single coordinated operation.
Step 4: Verify Everything Came Up Clean
After both OMS nodes finish patching, run a quick validation across the components:
bash
# OMS Platform version — should be 24.1.0.8
$OMS_HOME/OMSPatcher/omspatcher lspatches

# JDK version — should be 1.8.0_481
$OMS_HOME/oracle_common/jdk/bin/java -version

# OPatch version — should be 13.9.4.2.22
$OMS_HOME/OPatch/opatch version

# OMS status — should be Up
$OMS_HOME/bin/emctl status oms -details
Then log into the OEM console. If it loads, alerts are processing, and your monitored targets show their normal status, the upgrade is operationally complete. The first sanity check I run on a fresh OEM upgrade is a quick check against an actively-monitored database target to confirm the metric collection cycle is unbroken.
In our environment, both OMS nodes were fully on RU8 plus Holistic 38864999, the console was responsive throughout, and not a single alert was missed during the entire upgrade window. Smooth like wind.
Step 5: Switching from Offline Mode to Online MOS via IDCS
This is the part of the upgrade that delivered the biggest operational change of all, and it has nothing to do with the patch itself.
When OEM is deployed using the official Marketplace stack, it comes up by default in offline mode, meaning the OMS has no outbound connectivity to My Oracle Support. Patches must be downloaded manually from MOS and uploaded via the Self Update workflow. New plug-ins must be staged manually. Self Update for connectors and management packs is unavailable. Every operational task that should be one click in OEM becomes a multi-step manual ritual.
After this upgrade, with security approval in place to allow outbound connectivity to specific Oracle MOS endpoints, we switched the OMS from offline mode to Online (MOS via IDCS) authentication. The change itself is a few emcli commands.
Set the OMS connection mode to online:
bash
# As oracle on either OMS
$OMS_HOME/bin/emcli login -username=sysman

# Configure MOS credentials and enable online mode
$OMS_HOME/bin/emcli set_connection_mode -mode=online

# Set MOS authentication credentials
$OMS_HOME/bin/emcli setup_credentials \
    -credentials_set=MOSCredential \
    -credentials="username:<mos_account>;password:<password>"

# Verify the configuration
$OMS_HOME/bin/emcli get_connection_mode

# Test the connection to MOS
$OMS_HOME/bin/emcli test_mos_credential
Once online mode is active and the credential test succeeds, every part of OEM that talks to MOS starts working immediately. The first thing that worked was Self Update, within a few minutes the console showed available updates for plug-ins, agents, connectors, and management packs that we had been managing manually for the last year.
What changed operationally after going online, and this is real, not theoretical:
- Self Update worked. New plug-ins, connector updates, and management pack revisions started flowing into OEM automatically. We no longer download zip files from MOS and stage them manually.
- Patch recommendations appeared. The Patch Recommendations dashboard inside OEM started showing applicable patches for monitored targets, with one-click download capability.
- New connectors became available. We added the MS SQL Server connector the same week. In offline mode this would have been a multi-day exercise of downloading, staging, and importing. Online mode made it a few clicks.
- Patch downloads happened automatically. When configuring patch plans for monitored databases, OEM now retrieved the patches directly from MOS.
- The product feels different. This is harder to articulate technically, but OEM in online mode feels alive. Suggestions appear. Updates surface themselves. The product is actively integrated with Oracle’s update infrastructure rather than being an isolated island.
If your OEM environment is currently in offline mode and you have any way to get security approval for outbound connectivity to Oracle’s MOS endpoints, push for it. The operational difference is dramatic.
What Changed in My Daily Operations?
I want to close with what this upgrade actually meant for the team day-to-day, because that is the part that matters more than any specific patch number.
OEM patching is no longer a Saturday night event. The next time we apply an OMS RU, we will do it during business hours. Monitoring stays up. Alerts keep firing. The change request will not include a “monitoring blackout” line item because there isn’t one.
Patch coordination is significantly simpler. The Holistic patch model means I no longer hunt down WebLogic PSUs, JDK updates, OPatch refreshes, and FMW client patches separately. One patch, one operation, everything updated in lockstep.
Online MOS connectivity changed how the team uses OEM. People now check the Self Update inbox in the morning the same way they check email. Patch recommendations are visible. New connector capabilities flow in. The product gets better between releases, not just at major upgrades.
This is what a modern OEM upgrade looks like in 2026. It is not perfect, and there is still real DBA judgment required, knowing when to apply, knowing how to read the output, knowing what to validate afterward. But the operational toil that used to surround OEM patching is genuinely gone. Saturday nights are for something else now.
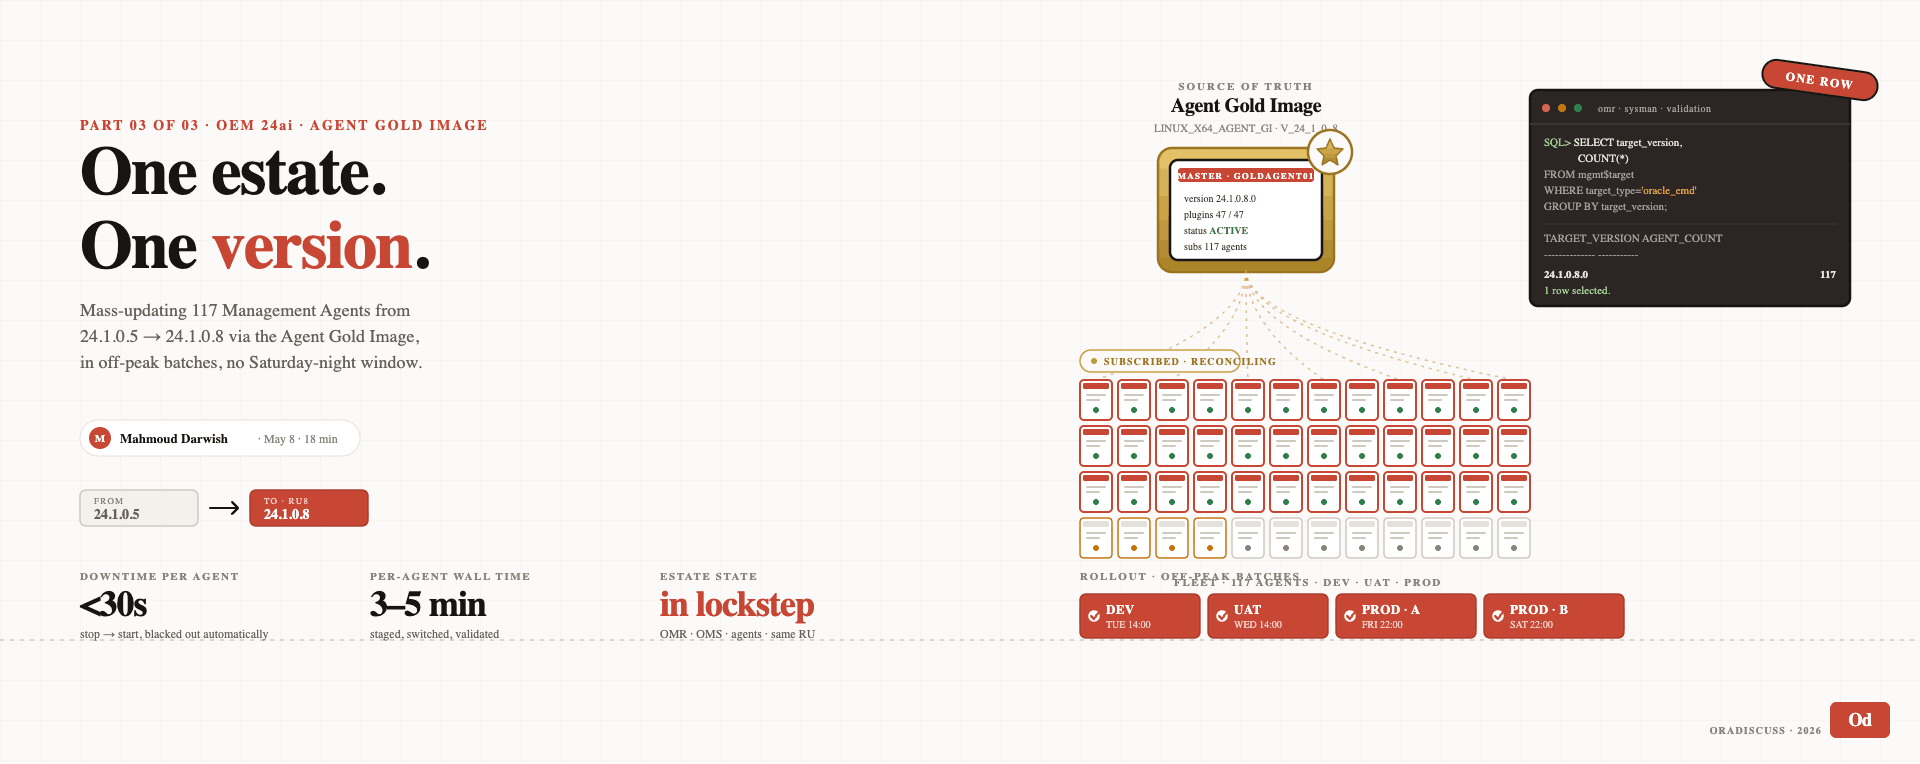
In Part 3 of 3, I will cover the final piece of the upgrade: pushing the agent updates from RU5 to RU8 across all monitored targets. The mass agent update workflow, the off-peak scheduling, and the validation that confirms every agent in the estate is on the new version. The conclusion of the journey.