By Mahmoud Darwish
There is a rule I follow before touching Oracle Enterprise Manager during any upgrade cycle, and it has saved me more than once:
Patch the repository database first. Everything else waits.
It sounds obvious when you say it out loud. But in practice, the pressure to get OEM upgraded, new features, new RU, new capabilities sitting there waiting, can tempt you to jump straight to the OMS patching and treat the repository database as an afterthought. Don’t. The OEM repository database is the foundation that everything else sits on. If it’s on the wrong patch level when you apply the OMS update, you are in for a bad time.
This is the first post in a three-part series documenting my upgrade of Oracle Enterprise Manager 24ai from RU5 to RU8. This article covers the repository database, specifically, how I moved the OMR from Oracle Database 19.28 to 19.30 by patching Grid Infrastructure first and the Database home second through the OCI Console, then applied an overlay patch manually via SSH that I found in the OEM RU8 README. Two different tools, one goal: get the foundation right before building on top of it.
The Starting Architecture
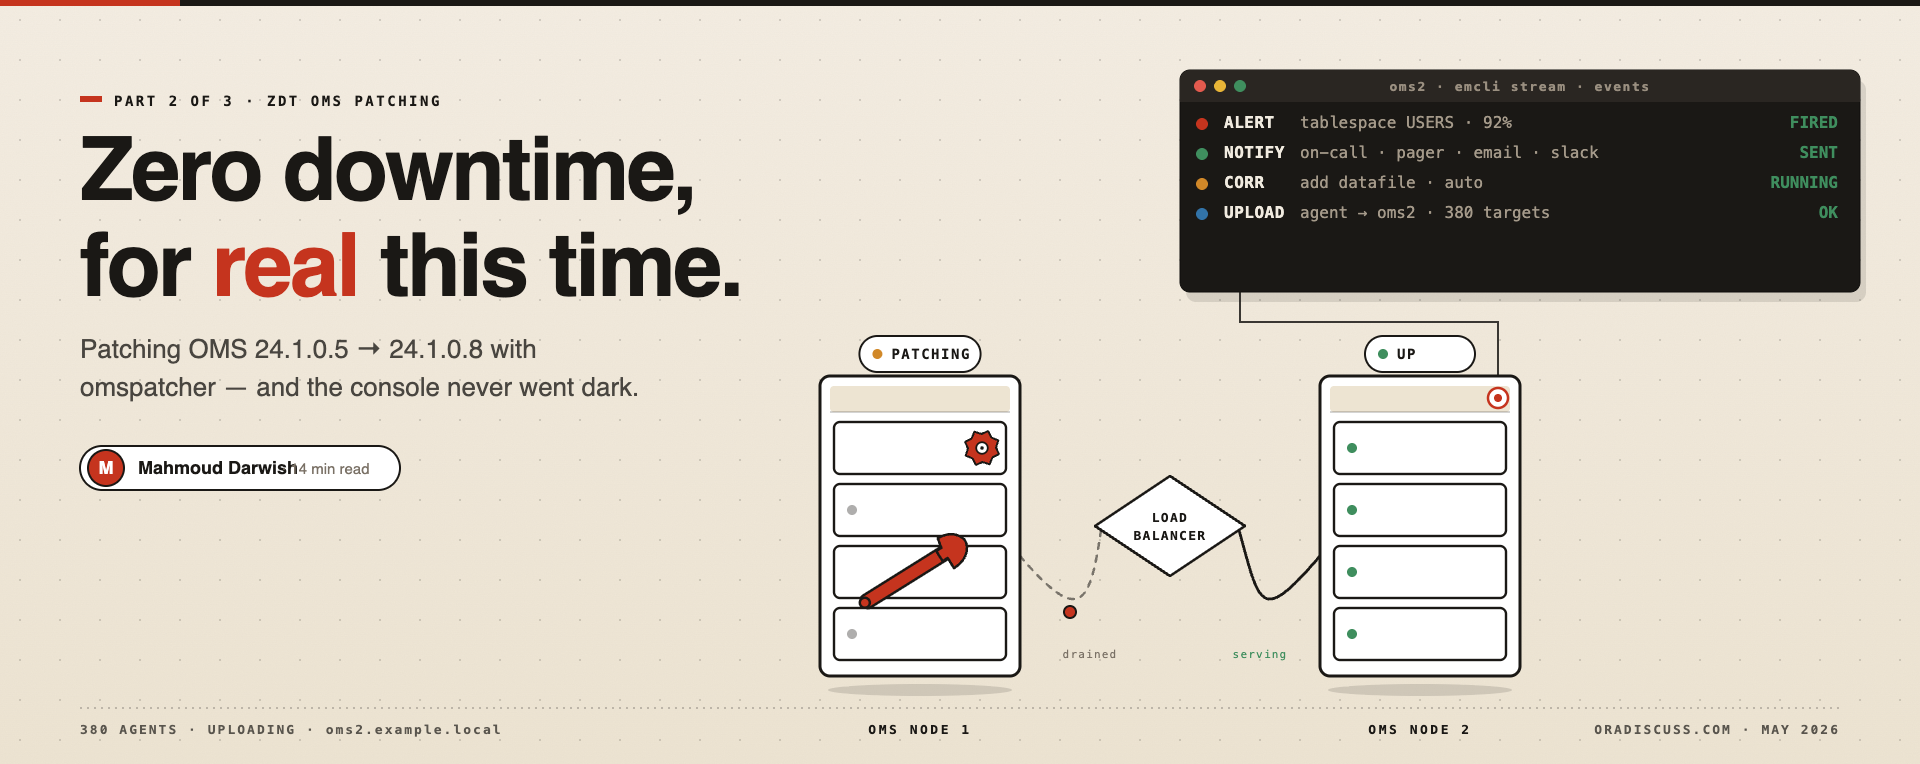
Before getting into the steps, let me describe the environment. Our OEM 24ai deployment was built using Oracle’s official Oracle Enterprise Manager Cloud Control image from the OCI Marketplace. The Marketplace stack provisions everything you need: two OMS instances, an OCI Load Balancer in front of them, and a 2-node RAC database on Oracle Base Database Service (DBCS) as the Management Repository (OMR).
The dual OMS behind a load balancer gives you high availability at the management layer. The RAC OMR gives you high availability at the repository layer. When one OMS is being patched, the other continues serving the console and monitoring targets, but that’s Article 2.
For now, the focus is the bottom of that diagram: the 2-node RAC DBCS running Grid Infrastructure and Oracle Database 19.28, needing to reach 19.30 plus an overlay patch before the OMS upgrade can safely begin.
Why the README Is the Most Important Document You’ll Read
Before starting any OEM release update, download and read the README for the specific RU you’re applying. Not the summary. The full prerequisites section.
In the OEM 24ai RU8 README, the prerequisites section specified two clear requirements for the OMR database:
Requirement 1: Oracle Database must be on 19.30
Requirement 2: GI MRP patch 39168344 (Grid Infrastructure Monthly Recommended Patch 19.30.0.0.260421) must be applied on top of 19.30
Understanding what patch 39168344 actually is matters before you start applying it:
- 39168344 is a cumulative GI MRP, Grid Infrastructure Monthly Recommended Patch. Cumulative means it includes the contents of all previous MRPs. You download and apply this single patch number.
- Inside 39168344, Oracle bundles many sub-patches. One of them 38641793, is the specific sub-patch from MRP version 260317 that OEM RU8 compatibility requires. You do not apply 38641793 separately. It comes along automatically when you apply 39168344.
- The MRP is applicable to both the Oracle DB Home and the Oracle GI Home. This is different from a standard DB-only patch, and it affects how you run the command.
- It is Oracle RAC Rolling Installable, meaning you can apply it one node at a time without bringing the cluster down.
The second requirement is what turned this into a two-tool exercise. The OCI Console patching workflow handles the main quarterly 19.30 Release Update beautifully, GI and DB homes, rolling, automated. It does not handle overlay patches. Those require SSH access and manual execution using opatchauto.
One thing worth understanding before you start: patch 38641793 is a DB Home patch, not a GI Home patch. This distinction matters when you apply it and when you verify it afterward, and it’s the source of one of the most common moments of confusion during this process. I’ll explain exactly what to expect when opatchauto runs so you don’t mistake correct behavior for an error.
Read the README. All of it.
Understanding the Patching Order on RAC — GI Before DB, Always..
On any Oracle RAC system, whether on-premises or on OCI, there is one rule about patch ordering that is non-negotiable: Grid Infrastructure must be patched before the Database home. Never after.
The reason is architectural. Grid Infrastructure manages the cluster layer, the voting disks, the OCR, the CRS stack that keeps your RAC instances coordinated. The Database home sits on top of GI and depends on it. If the DB home is at a higher patch level than GI, you can run into compatibility issues and unpredictable cluster behavior.
On OCI DBCS, the Console enforces this ordering automatically. When you initiate patching from the console, the system patches GI first across both nodes in a rolling manner, then patches the DB home across both nodes. You don’t have to think about the ordering, but understanding why it matters helps you make sense of what the console is doing and what to look for in the work request progress.
This is also why, when I applied the overlay patch manually afterward, I ran opatchauto, not opatch. opatchauto is Oracle’s tool for coordinated patching of both GI and DB homes together. It understands RAC topology, handles the correct sequence, and coordinates the cluster resource stops and starts automatically.
Step 1: Patching Grid Infrastructure to 19.30 via OCI Console
Navigate to the OMR database system in the OCI Console:
OCI Console > Oracle AI Database > Oracle Base Database Service
On the DB System Details page, confirm the current GI and DB patch level. In my case, both showed 19.28.
To initiate the GI patch, under the DB system itself, the “Update GI” tab contains the all versions that you have including the upgrades to 26ai (23.26.0.0.0), but this will be done later on, remember to do a pre-check and make sure it has been completed successfully before you decide to apply.
Patching mode: Rolling vs Non-rolling: For a 2-node RAC, always configure the Rolling mode. Rolling takes one node offline, patches it, brings it back, then patches the second node. Your OMR database remains available on the surviving node throughout. Non-rolling brings the entire cluster down, avoid it for a production repository.
Pre-checks: Before starting, OCI runs automatic prerequisite checks. Let these complete fully. They verify disk space, OPatch version compatibility, and cluster health. If anything fails, you want to know now.
Click Apply. OCI creates a Work Request you can monitor in real time.
The rolling GI patch on our 2-node RAC took approximately 45-60 minutes. During the entire operation, the OMR database remained available because one node was always up.
When the Work Request shows Succeeded, verify from the OS level, as grid user:
sudo su - oracle
$ORACLE_HOME/OPatch/opatch lspatches
39221823;OCW Interim patch for 39221823
39030362;ACFS Interim patch for 39030362
38830085;GEN0 (OSPID  60788)  TERMINATING THE INSTANCE DUE TO ORA ERROR 4031
34697081;NOT SHIPPING LIBAUTH_SDK_IAM.SO IN 23 SHIPHOME INSTALL
38523609;OJVM RELEASE UPDATE: 19.30.0.0.260120 (38523609)
38586770;JDK BUNDLE PATCH 19.0.0.0.260120
38729293;TOMCAT RELEASE UPDATE 19.0.0.0.0 (38729293)
38632161;Database Release Update : 19.30.0.0.260120(REL-JAN260130) (38632161)
36758186;DBWLM RELEASE UPDATE 19.0.0.0.0 (36758186)

OPatch succeeded.
The top entry should show the 19.30 GI patch number. GI is now at 19.30. The DB home is still at 19.28, that’s correct and expected at this point.
Step 2: Patching the Database Home to 19.30 via OCI Console
With GI successfully at 19.30, the DB home patching can proceed. The process is identical in structure, same console workflow, same rolling approach, but this time targeting the Database home.
From the Database tab, you will navigate to “Updates” tab, same as GI Updates, all patches will be there, choose the 19.30, pre-check it, apply it once it is a successful pre-check.
OCI creates another Work Request for the DB home patching. Monitor it the same way. The DB home rolling patch on our system took approximately 60-90 minutes.
When complete, verify both homes are at 19.30:
sudo su - oracle
$ORACLE_HOME/OPatch/opatch lspatches | head -3
39221823;OCW Interim patch for 39221823
39190094;MERGE ON DATABASE RU 19.30.0.0.0 OF 38722716 39142906
39168572;MERGE ON DATABASE RU 19.30.0.0.0 OF 38482035 38907556
And confirm the database itself reflects the new version:
SELECT inst_id, instance_name, host_name, version_full, status
FROM gv$instance
ORDER BY inst_id;

INST_ID INSTANCE_NAME 	 HOST_NAME 	VERSION_FULL 	STATUS
------- -------------      ---------- 	------------	------
1 	OMR1 		 node1 		19.30.0.0.0 	OPEN
2       OMR2              node2      	19.30.0.0.0   	OPEN
At this point: GI at 19.30, DB home at 19.30. The console work is done. Now the manual part begins.
Step 3: Applying GI MRP 39168344 Manually
With both homes at 19.30, the next step is applying GI MRP 39168344, the Grid Infrastructure Monthly Recommended Patch that the OEM RU8 README requires.
Prerequisites:
Download patch 39168344 from My Oracle Support. The file name will be p39168344_1930000DBRU_Linux-x86-64.zip. Stage it on both nodes in the same path and unzip it:
# On both Node 1 and Node 2
sudo su - oracle
mkdir -p /u01/app/patches
cd /u01/app/patches
unzip p39168344_1930000DBRU_Linux-x86-64.zip
Important before you start: understand what this patch touches.
Run the analyze step first:
The README explicitly recommends running opatchauto in analyze mode before the actual apply. This checks for conflicts with any currently installed interim patches without making any changes:
# As grid user — analyze both GI and DB homes together (Case 1)
sudo su - grid
cd /u01/app/patches
$GRID_HOME/OPatch/opatchauto apply ./39168344 -analyze
Review the analyze output carefully. If any conflicts are reported, resolve them via MOS before proceeding. Do not skip the analyze step, it is your safety check before you start touching the production cluster.
# DB Home OPatch — as oracle user
sudo su - oracle
$ORACLE_HOME/OPatch/opatch version

# GI Home OPatch — as grid user
sudo su - grid
$GRID_HOME/OPatch/opatch version
If either is below the README requirement, update OPatch before proceeding. OPatch updates are available from MOS and applied by replacing the OPatch directory.
Phase 1: Pre-patch on Node 1
# SSH into Node 1, switch to root
sudo su - root
# Prepare the cluster for patching
$GRID_HOME/crs/install/rootcrs.sh -prepatch
The -prepatch step stops specific CRS resources in a controlled manner, preparing the GI stack to receive the patch. You will see output listing which resources are being stopped. Let it complete fully before proceeding.
Phase 2: Apply the binary patch on Node 1
# As grid user on Node 1 — patches both GI and DB homes together
cd /u01/app/patches
$GRID_HOME/OPatch/opatchauto apply ./39168344
opatchauto reads the patch metadata and routes each sub-patch to the correct home automatically. GI-specific sub-patches go to the GI Home. DB-specific sub-patches, including 38641793, then go to the DB Home. You do not need to specify which home gets which sub-patch. The patch metadata handles this.
The process took approximately 25 minutes per node in our environment. Let it run to completion without interruption.
Phase 3: Post-patch on Node 1
# As root on Node 1
sudo su - root
$GRID_HOME/crs/install/rootcrs.sh -postpatch
The -postpatch step restarts the CRS resources that were stopped and confirms the cluster is healthy. Watch for all resources coming back to ONLINE status.
# Verify cluster health after postpatch
$GRID_HOME/bin/crsctl status resource -t
All resources must show ONLINE before you touch Node 2.
Repeat Phases 1-3 on Node 2:
The same sequence runs identically on Node 2. By the time you are patching Node 2, Node 1 is fully patched and back in the cluster, the OMR database remains available throughout.
# Node 2 — identical sequence
sudo su - root
$GRID_HOME/crs/install/rootcrs.sh -prepatch

# As oracle user
sudo su - oracle
$ORACLE_HOME/OPatch/opatchauto apply /u01/app/patches/38641793 -oh $ORACLE_HOME

# As root
sudo su - root
$GRID_HOME/crs/install/rootcrs.sh -postpatch
Step 4: Verifying the Binary Patch
With both nodes patched, verify the overlay patch is correctly registered in the DB Home on both nodes. Remember, look in the DB Home only. The GI Home will not show this patch and that is correct.
# Run on BOTH Node 1 and Node 2 — as oracle user
# Output should be identical on both nodes
ORACLE_HOME=/u01/app/oracle/product/19.0.0.0/dbhome_1
$ORACLE_HOME/OPatch/opatch lspatches | grep 38641793
38641793;X10M FADB23 FA ADMIN SERVER NOT STARTING -- ORA-17401  PROTOCOL VIOLATION.  [ 14, 3, ]
Step 5: Running datapatch
Once both nodes have the binary patch applied and the cluster is fully healthy, run datapatch from one node only. datapatch applies the SQL-level dictionary changes that correspond to the binary patches. It is cluster-aware and only needs to run once regardless of the number of RAC nodes.
# On Node 1 only — as oracle user
cd $ORACLE_HOME/OPatch
./datapatch -verbose
Watch the output carefully. datapatch lists each patch being applied at the SQL level and confirms success for each one. A clean run ends with no errors and a clear success summary.
Step 6: SQL-Level Verification
After datapatch completes, run this query to confirm both the base 19.30 RU and the overlay patch are correctly applied at the dictionary level. This is the definitive check.
-- Run on ONE node as sysdba — covers the entire RAC cluster
sqlplus / as sysdba

SELECT
    patch_id,
    action,
    status,
    description
FROM
    dba_registry_sqlpatch
WHERE
    patch_id ='38641793'
ORDER BY
    action_time DESC;

  PATCH_ID ACTION          STATUS                    DESCRIPTION
---------- --------------- ------------------------- ----------------------------------------------------------------------------------------------------
  38632161 APPLY           SUCCESS                   Database Release Update : 19.30.0.0.260120(REL-JAN260130) (38632161)
Step 7: Final Validation Checklist
Before moving to Article 2 and the OMS upgrade, run this checklist. Ten minutes here prevents problems mid-OMS-upgrade.
Check 1: Cluster resource health on both nodes
$GRID_HOME/bin/crsctl status resource -tAll resources ONLINE on both nodes. No resource in INTERMEDIATE or OFFLINE state.
Check 2: Both RAC instances open
SELECT
    inst_id,
    instance_name,
    status,
    database_status
FROM
    gv$instance
ORDER BY inst_id;
Both instances: STATUS = OPEN, DATABASE_STATUS = ACTIVE
Check 3: Patch inventory consistent and correct across both nodes
# Run on both Node 1 and Node 2
# GI Home — should show 19.30 GI patches, NOT 38641793
$GRID_HOME/OPatch/opatch lspatches
39221823;OCW Interim patch for 39221823
39030362;ACFS Interim patch for 39030362
38830085;GEN0 (OSPID  60788)  TERMINATING THE INSTANCE DUE TO ORA ERROR 4031
34697081;NOT SHIPPING LIBAUTH_SDK_IAM.SO IN 23 SHIPHOME INSTALL
38523609;OJVM RELEASE UPDATE: 19.30.0.0.260120 (38523609)
38586770;JDK BUNDLE PATCH 19.0.0.0.260120
38729293;TOMCAT RELEASE UPDATE 19.0.0.0.0 (38729293)
38632161;Database Release Update : 19.30.0.0.260120(REL-JAN260130) (38632161)
36758186;DBWLM RELEASE UPDATE 19.0.0.0.0 (36758186)

OPatch succeeded.


# DB Home — MUST show 38641793
$ORACLE_HOME/OPatch/opatch lspatches | grep 38641793
38641793;X10M FADB23 FA ADMIN SERVER NOT STARTING -- ORA-17401  PROTOCOL VIOLATION.  [ 14, 3, ]
Output must be identical on both nodes for the DB Home check. Any discrepancy means the patch was not cleanly applied on one node.
Check 4: OEM console accessible and OMR connected
Log into the OEM console — if it loads, the OMR is serving connections correctly. Then confirm explicitly from the repository details page.
Confirm the repository shows the correct database version and the connection status is active.
The Complete Picture After Article 1
When all six checks pass, your OMR database stack looks like this:
Grid Infrastructure:  19.30 (OCI Console — rolling)
Oracle Database:      19.30 (OCI Console — rolling)
Overlay patch:        38641793 in DB Home (manual opatchauto)
datapatch:            38632161 + 38641793 SUCCESS
Cluster health:       All resources ONLINE both nodes
OEM console:          Repository connection active
This is precisely the state the OEM RU8 README requires. The foundation is correct and verified at three levels: binary (OPatch), SQL dictionary (datapatch), and connectivity (OEM console). The OMS upgrade can proceed safely.
A note for those who hit the opatchauto GI skip message and stopped: now you understand why it happens and what to check. The patch lives in the DB Home. Check the right drawer.
In Part 2 of 3, I’ll cover the OMS upgrade from 24.1.0.5 to 24.1.0.8 using ZDT patching via omspatcher, the Holistic patch 38864999 covering WebLogic PSU, JDK 8, OPatch, and FMW DB Client, and one of the most operationally impactful changes of the entire upgrade cycle, switching OEM from offline mode to online MOS connectivity via IDCS, a change that required convincing the security team and changed how we manage patches permanently.